The Eye of the Jailer
Guida in italiano Qua!
Cliccate su Leggi Tutto per la guida completa in inglese!
The Eye of the Jailer Quick Tips
General
-
Move out of the
 Fractured Soul impact zone.
 -
If struck by Fractured Soul, collect your Soul Shards to remove the debuff.
-
Use Grapple to avoid being hit by
 Annihilating Glare.
 -
Wait for the Deathseeker Eyes to spawn before getting close to their spawn location.
-
Move away from other players when targeted by
 Desolation Beam.
 -
Move to the edges of the room when targeted by
 Spreading Misery to drop
  Jailer's Misery pools.
Tanks
-
Taunt swap after each cast of
 Deathlink.
 -
In Phase 2, split up and each tank grab a Deathseeker Eye and take it to the back of the platform.
-
Keep the Deathseeker Eyes further than 30 yards away from each other to prevent triggering
 Suffering.
Healers
-
Dispel players affected by
 Slothful Corruption.
 -
Use healing cooldowns during
 Titanic Death Gaze in Phase 2.
 -
Use health re-distributing cooldowns, and damage reduction cooldowns when stacks of
 Immediate Extermination get high.
DPS
-
Kill both Deathseeker Eyes within 8 seconds of each other to prevent triggering Suffering.
-
Kill the boss before Immediate Extermination stacks too high.
-
Use Time Warp in the last phase.
The Eye of the Jailer Abilities & Strategy

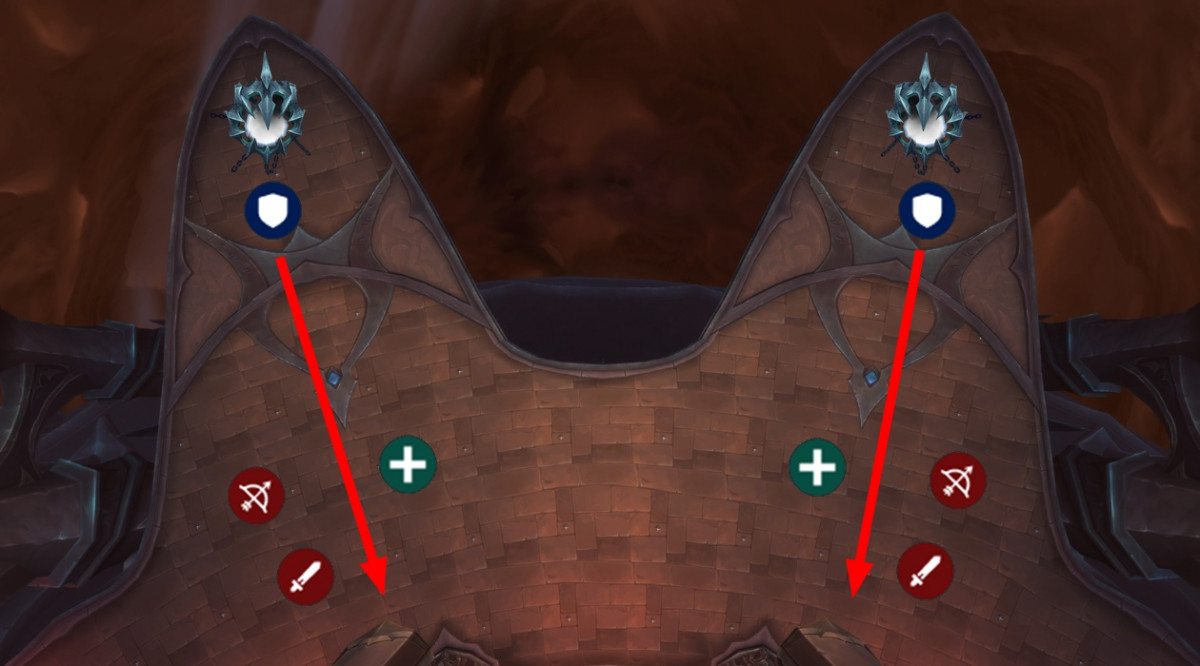
General positioning during Phase One and Three.
Phase One of this encounter will repeat two times, and will mostly require players to dodge simple mechanics, such as the ![]() Annihilating Glare and
Annihilating Glare and ![]() Fractured Souls.
Fractured Souls.
General positioning during Phase Two.
At 66%, and 33% Phase Two will trigger, where two Deathseeker Eyes will spawn where the raid must split up in two groups to kill each eye while being affected by a few extra mechanics. We recommend sending half your tanks, healers and DPS to each side, utilizing the back of the encounter area to drop ![]() Spreading Misery pools while being spread loosely to avoid hitting others when targeted by
Spreading Misery pools while being spread loosely to avoid hitting others when targeted by ![]() Desolation Beam.
Desolation Beam.
Once the third Phase Two is completed, the boss will enter Phase 3. Players will have a limited time to kill the boss due to the ![]() Immediate Extermination debuff, which will reduce the amount of healing taken by players until they cannot be healed anymore. It is recommended to spread loosely around the center of the platform and use Time Warp to make this phase as quick as possible.
Immediate Extermination debuff, which will reduce the amount of healing taken by players until they cannot be healed anymore. It is recommended to spread loosely around the center of the platform and use Time Warp to make this phase as quick as possible.
The Eye of the Jailer Phase One: 100% - 33%
Fractured Soul
The boss will bombard random players, causing them to take shadow damage and cause them to split into three ![]() Fractured Souls.
Fractured Souls.
-
Each Fractured Soul reduces movement speed, damage, and healing done until the player walks over the soul.
-
The main way of dealing with this mechanic is to avoid being hit by the bombardament part.

Annihilating Glare
The boss will start channeling ![]() Annihilating Glare at one side of the platform, then sweep across the entire area.
Annihilating Glare at one side of the platform, then sweep across the entire area.
-
The boss may start casting Annihilating Glare at either side of the platform.
-
Once the boss picks a side, the whole raid should run to the opposite Grapple point and activate the extra action button to Grapple across to the other side.
 Piercing Lens
The boss will inflict a burst of physical damage to its current target.
-
Standard tank-buster mechanic that shouldn’t be too dangerous.
Deathlink
The Eye of the Jailer periodically damages its main target with a large Physical hit that will also deal damage to the entire raid based on how much damage the tank takes.
-
Taunt swap after each Deathlink.
-
Use large damage mitigation cooldowns on each hit to avoid reverberating too much damage to the raid.
The Eye of the Jailer Phase Two (Intermission): 66%, 33%
Deathseeker Eye
When the intermission starts, a Deathseeker Eye will spawn at each peak of the platform.
-
Tanks should move Deathseeker Eyes to the back of the room and keep them more than 30 yards apart.
-
Both Deathseeker Eyes must be killed within 8 seconds of each other, otherwise they trigger Suffering.
Slothful Corruption
Random targets will get fatigued, taking shadow damage and have their spell casting, ranged attack speed, and movement reduced by 40%.
-
Healers should dispel affected targets when possible.
Spreading Misery
During the Intermission random players will be affected by ![]() Spreading Misery.
Spreading Misery.
-
Players affected by Spreading Misery will drop a pool of Jailer's Misery which will persist for the rest of the encounter.
-
It is best to drop the pools near the walls or the edge of the platform to maximize space.
Desolation Beam
Occasionally random players will be targeted by a ![]() Desolation Beam that deals damage and chains to nearby players.
Desolation Beam that deals damage and chains to nearby players.
-
Move further than the range indicator away from other players to avoid the Desolation Beam from chaining.
Titanic Death Gaze
The Eye of the Jailer will periodically deal a burst of damage to the raid.
-
The Titanic Death Gaze introduces a significant amount of damage taken to the raid during this intermission.
-
Healing cooldowns can be assigned to ease the damage of this phase.
The Eye of the Jailer Phase Three: 33% - 0%
After the 25% Intermission, the boss will enter Phase Three, where the raid has a limited amount of time to kill the boss.
Immediate Extermination
Every 6 seconds, the boss will apply a stack of ![]() Immediate Extermination, which will increase the bosses attack rate, and reduce the healing received by the raid by 10%.
Immediate Extermination, which will increase the bosses attack rate, and reduce the healing received by the raid by 10%.
-
The healing reduction will increase until the raid is no longer healable.
-
Absorbs and Health sharing effects, such as Spirit-Link Totem can still be used.
Heroic The Eye of the Jailer
The only change introduced on Heroic difficulty is the addition of Stygian Abductors. These mobs will float near the boss, and target random players with ![]() Dragging Chains. Several players should stand near the targeted person to reduce the effect of the pull.
Dragging Chains. Several players should stand near the targeted person to reduce the effect of the pull.
Once Stygian Abductors land, they should be quickly killed while the tanks taunt swap after two stacks of ![]() Assailing Lance.
Assailing Lance.
Stygian Abductor
Stygian Abductors will periodically spawn and fly around near the boss.
 Dragging Chains
The Stygian Abductor will target a random player and hurl a chain at them striking the player and all others within 6 yards, then pulling them towards the Stygian Abductor.
-
The more players stand in the chain, the lower the effect of the pull will be.
-
After 6 seconds the Stygian Abductor will be pulled to the platform.
 Assailing Lance
Once the Stygian Abductor is grounded, they will throw the ![]() Assailing Lance at their target causing them to take Physical damage and bleed for 10 seconds.
Assailing Lance at their target causing them to take Physical damage and bleed for 10 seconds.
-
Tanks should taunt swap at 2 stacks of Assailing Lance when possible.