Prophet Skitra
Guida in italiano qua!
Cliccate su Leggi Tutto per la guida completa in inglese!
Prophet Skitra Quick Tips
Phase One
-
Stack up on one side of the boss and let
 Shred Psyche debuffs expire on the other.
 -
Stay away from Shredded Psyche adds when they cast
 Psychic Outburst. Kill them as soon as possible after this cast ends.
 -
Tanks should taunt off of one another when their
 Shadow Shock debuff times out (usually around 4-6 stacks).
 -
Try and enter phase two with no Shredded Psyche adds alive.
-
Crowd control Image of Absolution and stay out of their
 Surging Images aura. You can kill them 30 seconds after they spawn (Heroic Only).
Phase Two
-
Speak with players with a different debuff type to identify which boss illusion is shared between you.
-
Kill this boss illusion as soon as possible to reduce the amount of
 Dark Ritual stacks you gain.
 -
Stack near the add you are killing as to allow healers to efficiently heal the incoming raid damage from
 Illusionary Bolt.
 -
Make sure you kill the correct illusion, as otherwise the raid takes large damage from
 Mindquake.
Prophet Skitra Phase One
 Shadow Shock
Instead of melee hitting, the boss hits the tank with ![]() Shadow Shock every few seconds.
Shadow Shock every few seconds.
-
This deals a burst of shadow damage and increases shadow damage taken by 15% for 5 seconds to the tank and two other random players.
-
Tanks should taunt off of one another each time their debuff drops, usually around the 4-6 stack mark.
-
Healers need to be aware that two random players will also be taking burst damage throughout the phase and will require spot healing.
 Shred Psyche
Every 30 seconds, the boss will apply the ![]() Shred Psyche debuff on up to two players.
Shred Psyche debuff on up to two players.
-
After these 5 second debuffs expire, a Shredded Psyche add will spawn at the location of the debuffed player.
-
These adds initially cast
 Psychic Outburst. After this 5 second long cast completes, it deals a large burst of shadow damage to the entire raid. This damage falls off with distance.
 -
After the
 Psychic Outburst, the adds will channel
  Psychic Reverberations until they are killed, which deals moderate shadow damage every 1.5 seconds.
To deal with this mechanic easily and cleanly, the raid should stack entirely on one side of the boss.
-
Players afflicted with the
 Shred Psyche debuff should move to the opposite side of the boss, roughly 20 yards from the raid stack point.
 -
Once the adds have spawned, all players should return to the raid stack point as to ensure that they do not take too much damage from the
 Psychic Outburst cast.
 -
DPS should immediately swap to the adds and kill them off, although melee DPS should wait until after the
 Psychic Outburst has ended.
 -
The sooner the adds die the better, not just to help healers but also to make sure that only one set of adds are active at any given time.
-
If the boss isn't within cleave range of the add, it should be moved to keep outgoing boss damage high.
-
This should take place in the middle of the bosses long encounter space, as to help with positioning once phase two begins.

Stack up on one side and spawn the adds on the other!
Once the boss reaches 80% health, phase two will begin.
-
Ideally the group would not transition into phase two with a Shredded Psyche add active, as this can slow down how quickly the group can get out of phase two.
Prophet Skitra Phase Two
 Illusionary Projection
Upon entering phase two, the boss casts ![]() Illusionary Projection.
Illusionary Projection.
-
This gives half the raid one a red debuff (
 Clouded Mind), and the other half a blue debuff (
 Twisted Mind).
 -
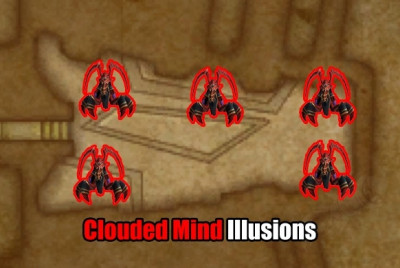
The red half of the raid will see 5 illusions of Prophet Skitra around the edges of the encounter space.
-
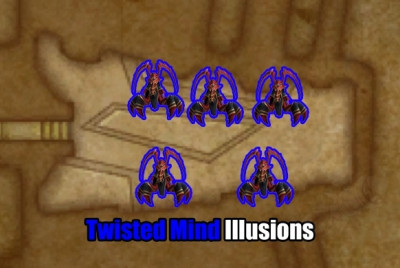
The blue half of the raid will see 5 different illusions of Prophet Skitra around the edges of the encounter space, in different locations to what the red half sees.
-
The red half and blue half will both have a single illusion that occupies the same place. This is the illusion that needs to be killed to end the phase.
There are multiple different strategies that raids can use to try and identify which illusion is the one that needs to be killed, however one seems to be most easy to use.
-
The raid leader should put raid markers next to each of the illusion locations that they can see.
-
They should then ask a player of the opposite debuff type to tell them which of the markers has an enemy next to it.
-
As long as the raid leader has asked somebody of the opposite debuff type, then this will be the illusion you need to kill.
-
Once the add has been killed and the phase has ended, the raid leader should remove all world markers ready for the next phase two.
 |
 |
| These are the illusions the debuffs can see. |
These are the illusions the debuffs can see. |

The white-outlined illusion is present for both teams! Kill that one!
During the phase, the raid will be taking damage from the illusions as they spam cast ![]() Illusionary Bolt.
Illusionary Bolt.
-
This just deals a burst of shadow damage to random players.
-
The raid should try and remain stacked up during this phase as to allow healers to efficiently AoE heal through the incoming damage.

Aside from position, all of the illusions are identical.
 Dark Ritual
Additionally, players will be receiving a debuff every 5 seconds called ![]() Dark Ritual.
Dark Ritual.
-
This increases shadow damage taken by 2% and lasts forever.
-
This encourages the raid to leave the phase as soon as possible, as having high
 Dark Ritual stacks can lead to players dying easily later on in the encounter.
 Mindquake
Killing the incorrect illusion will trigger a ![]() Mindquake, dealing a large burst of shadow damage to the raid.
Mindquake, dealing a large burst of shadow damage to the raid.
-
This will likely wipe you, as not only do you take a large burst of damage, but you have also wasted a lot of time in this phase which has left a large amount of
 Dark Ritual stacks on you.
Strategy Notes
The ![]() Illusionary Projection mechanic has a couple of properties that you may want to know if you are thinking of your own way of dealing with the mechanic!
Illusionary Projection mechanic has a couple of properties that you may want to know if you are thinking of your own way of dealing with the mechanic!
1) The debuff that you are given is random each time you enter phase two.
-
The only set patterns to this is that tanks are always given opposite debuffs and the boss attempts to split the healers between debuff groups evenly.
-
This makes tank players good candidates for calling which illusion is the actual boss, as the two tanks can always talk to each other and work it out as they'll be in different teams.
2) Target Markers are not shared between the different debuffs.
-
As an example: The red side could mark all 5 of their illusions and the blue side would not see any target markers appear on their screen.
-
This is intended to prevent you from immediately finding the Illusion through a marking weakaura.
3) Debuffs applied to the correct illusion will show on target frames for both groups.
-
This potentially allows one player with an instant cast debuff spell (such as Moonfire) to quickly apply them to all of the illusions they can see.
-
The opposite team can then quickly look through their illusions to find the one that is debuffed.
-
This would require restraint from the rest of the group, as any additional debuff applications would make it more difficult to find the illusion.
4) There isn't a foolproof, reliable weakaura or addon that identifies the correct illusion. Not one that is publicly available at least.
-
There are people that are working on a weakaura or addon to counter this mechanic, it may very well be available already.
-
If addon solution to this mechanic that works 100% of the time is found, this section of the guide will be updated with links and information for it.
Once the correct illusion of Prophet Skitra has been defeated, the boss will reappear at the defeated illusions locations and phase one will begin.
-
The fight then repeats, with the boss entering phase two each time it loses 20% health.
-
Healers will want to ensure that they have healing cooldowns available for subsequent phase twos, as the raid will be taking a large amount of damage due to the
 Dark Ritual stacks they have accumulated throughout the fight.
Prophet Skitra Heroic Difficulty
Image of Absolution
During phase one, the boss will occasionally cast Image of Absolution.
-
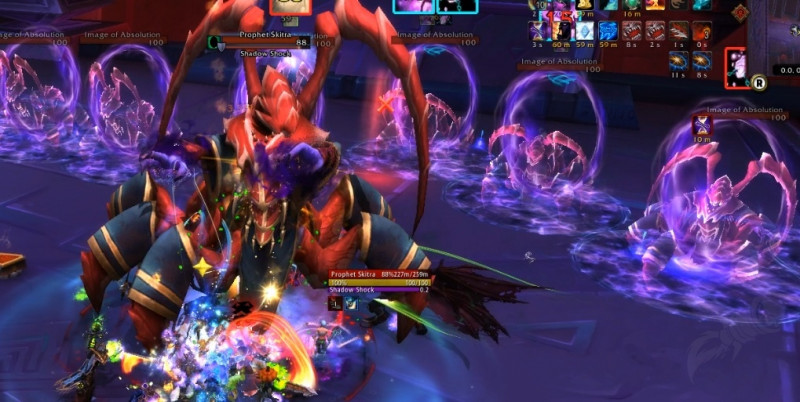
This spawns a wall of Image of Absolution adds that runs the entire length of the encounter space.
-
These adds have 1hp, however they are immune to all damage taken for 30 seconds due to their Intangible Illusion passive.
-
Each add has a
 Surging Images zone around them which deals high shadow damage every second to any player that stands within it.
As soon as the adds spawn, they will attempt to walk back and forth across the room, dealing heavy damage to anyone they touch.
-
The adds need to be crowd controlled to prevent them from moving whilst the raid waits out their Intangible Illusion damage immunity.
-
After the 30 seconds have passed, the adds can simply be killed via any small amount of damage.
As the raid is stacked to the side of the boss, and the boss does not need to move during phase one, the amount of adds you need to control is actually quite low.
-
One simple Mass Entangling Roots centred on the correct add can easily keep the raid safe. Once the root ends, the adds can be killed.
-
All other adds can be left alone as they harmlessly walk side to side in the room away from the stacked raid team.
-
All forms of crowd control that can hit Elementals or Aberrations will work.
-
Good spells to remove a large amount of image adds that you may want to have a player take are spells such as Halo or Barrage.
The raid might still have Images active during phase two.
-
These adds should be crowd controlled and then killed if they are in the path towards the correct
 Illusionary Projection.

