Mytrax the Unraveler
Loot
For more information on item levels, check out our Battle for Azeroth Item Level Guide.
Armor:
-
Cloth:
 Robes of the Unraveler
 -
Leather:
 Cowl of Dark Portents
 -
Plate:
 Chitinspine Pauldrons
Trinkets:
Weapons:
-
2H Strength Sword:
 Voror, Gleaming Blade of the Stalwart
 -
1H Strength Sword:
 Luminous Edge of Virtue
 -
Intellect Off-hand:
 Codex of Imminent Ruin
Quick Tips
All phases:
-
Gather
 Existence Fragment orbs to remove your
  Annihilation stacks, leaving any orbs for players with excessive Annihilation stacks.
Phase One:
-
Spread at least 8 yards apart from one another as to prevent multiple people from getting hit by a single
 Oblivion Sphere.
 -
Displace or attack charmed players to move them from the Oblivion Spheres radius.
-
Move out of the
 Obliteration Blasts path.
 -
Move 40+ yards away from your allies when afflicted with
 Imminent Ruin to reduce the incoming raid wide damage it deals upon expiration.
 -
Whenever an area becomes too cluttered with Oblivion Spheres, move as a raid to a more clear area to allow for better movement.
-
Do not stand in front of the boss, as you may be hit by the
 Essence Shear ability aimed towards the tank.
Phase Two:
-
Spread out at the beginning of the phase before stacking in an sphere free location after the two Oblivion Spheres have spawned.
-
Avoid gathering Existence Fragments during this phase, as positioning is more important than immediately removing Annihilation stacks.
-
Interrupt and cleave down the Vision of Madness adds.
-
Focus damage into the N'raqi Destroyer adds whilst interrupting their
 Void Volley casts.
 -
Avoid the lethal
 Obliteration Beam coming from Mythrax throughout the phase.
 -
Do not stand within the
 Oblivion Veil around Mythrax
Tank-Specific Quick Tips
Phase One:
-
Face Mythrax into the wall, turned away from the raid, to ensure you are the only person hit by Essence Shear.
-
Taunt off one another after each Essence Shear.
-
Be prepared to move the boss into an area with less Oblivion Spheres.
Phase Two:
-
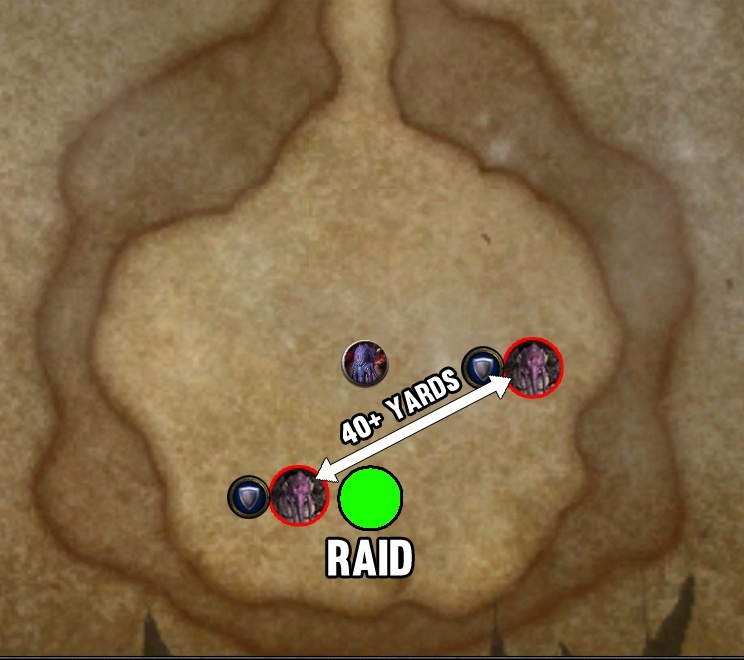
Keep the two N'raqi Destroyer adds at least 40 yards apart, with one being tanked near the raid.
-
Coordinate with teammates to ensure that no Void Volley casts go through.
Healer-Specific Quick Tips
-
Players will slowly lose maximum health over time, be prepared to keep the raid topped up towards the end of the encounter.
Phase One:
-
Heal the Imminent Ruin afflicted targets as they move away from the group.
-
Try and remain within the centre of the spread out raid group as to maintain range on all players.
Phase Two:
-
Use a healing cooldown to counter the unavoidable damage from
 Xalzaix's Awakening.
Mythrax the Unraveler Abilities
Annihilation
Several of Mythrax's abilities in both phases will apply ![]() Annihilation to players.
Annihilation to players.
-
This permanent debuff reduces the players maximum health by 1% per stack and deals a light amount of shadow damage every 3 seconds.
-
Players need to avoid getting hit by as many abilities as possible to keep their Annihilation stacks low.
-
Annihilation stacks cannot be removed via Immunity spells or even player death.
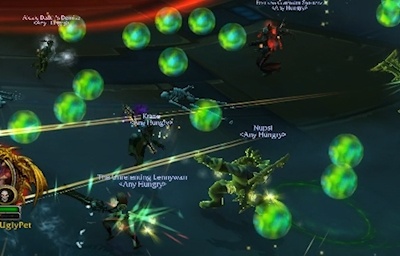
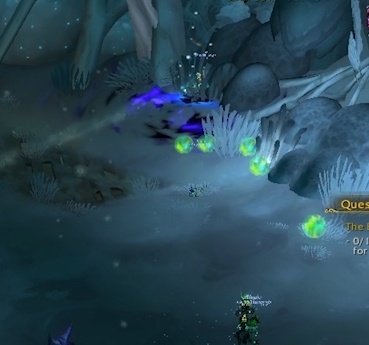
When ![]() Annihilation is applied, there is a chance that
Annihilation is applied, there is a chance that ![]() Existence Fragment orbs will spawn near the players location.
Existence Fragment orbs will spawn near the players location.
-
These orbs will remain on the ground and can be ran into. Doing so will absorb the Existence Fragment and remove 2 stacks of Annihilation.
-
Whenever possible, players should run into these orbs when they happen to gain Annihilation stacks.
-
As an example: If the player is hit by an ability and gains 8 Annihilation, it is likely that they will only spawn 1-3 Existence Fragment orbs, leaving them with 2 Annihilation stacks after soaking their orbs.
-
This means that the Existence Fragment orbs cannot be relied on to cover for players mistakes. Instead they're around to help lessen the impact of Annihilation, not to remove it completely.
![]() Existence Fragment orbs can collected by anybody with
Existence Fragment orbs can collected by anybody with ![]() Annihilation stacks, meaning that a player can purposely gain
Annihilation stacks, meaning that a player can purposely gain ![]() Annihilation stacks to generate orbs for another player to use.
Annihilation stacks to generate orbs for another player to use.
-
You may want to utilize this if a key member, such as a tank, happens to gain many Annihilation stacks early on without the means to remove them.
-
The raid group can decide to leave all orbs alone to allow that tank to collect them, giving them a large amount of their maximum health back.
-
That being said, as long as players deal with the encounters mechanics correctly, this situation should not arrise.
Phase One
Essence Shear
On a timer, Mythrax will cast ![]() Essence Shear towards the tank, dealing a burst of shadow damage and applying multiple stacks of
Essence Shear towards the tank, dealing a burst of shadow damage and applying multiple stacks of ![]() Annihilation to all players within a 15 yard cone.
Annihilation to all players within a 15 yard cone.
-
The tank should position Mythrax at the side of the encounter space and face him into the wall to ensure that they are the only player hit.
-
Essence Shear also applies a debuff which prevents the player from generating any new Existence Fragments when afflicted by new Annihilation stacks for 25 seconds.
-
As Essence Shear is cast more frequently than every 25 seconds, the tanks should taunt off of each other after every hit to ensure that Essence Shear generates the Existence Fragments needed to clear the majority of the Annihilation stacks that is applies.
-
The tanks may wish to hold off taunting immediately, as to allow the freshly hit tank to gather their Existence Fragment orbs first before the new tank takes up their position.
Oblivion Sphere

Throughout the phase, Mythrax will spawn an ![]() Oblivion Sphere at the location of a random non-tank player.
Oblivion Sphere at the location of a random non-tank player.
-
This orb will charm all players within its area of effect whilst applying Annihilation to them every 2 seconds.
-
Players will remain charmed by the orb until they are knocked out of its sphere of influence, either by using displacement effects or by attacking the player, which knocks them back slightly.
-
Once a player is freed, they will trigger a Crashing Oblivion which deals a burst of shadow damage to the entire raid.
-
The entire raid should spread 8 yards apart from one another, whilst still remaining within healing range, to minimize the chance of more than one player being charmed by any given Oblivion Sphere upon spawning.
-
As soon as it has spawned, the charmed player should be quickly freed, ideally by using a displacement ability such as
 Death Grip or
  Ring of Peace.
 -
If the group needs to use damage to free the player, a single DPS should be responsible for this, as damage coming from multiple directions will only serve to knock the player around whilst remaining within the spheres radius.
-
The raid must also make sure that they are healthy enough to take the Crashing Oblivion damage before they free their ally.
![]() Oblivion Spheres do not despawn instantly, instead choosing to hang around the encounter space for minutes at a time.
Oblivion Spheres do not despawn instantly, instead choosing to hang around the encounter space for minutes at a time.
-
The raid may need to shift from one area of the room to another, if their current area becomes too cluttered with spheres.
-
That being said, a side of the room should be left relatively clear for phase two, as the entire raid will need a clear area to dodge mechanics in.
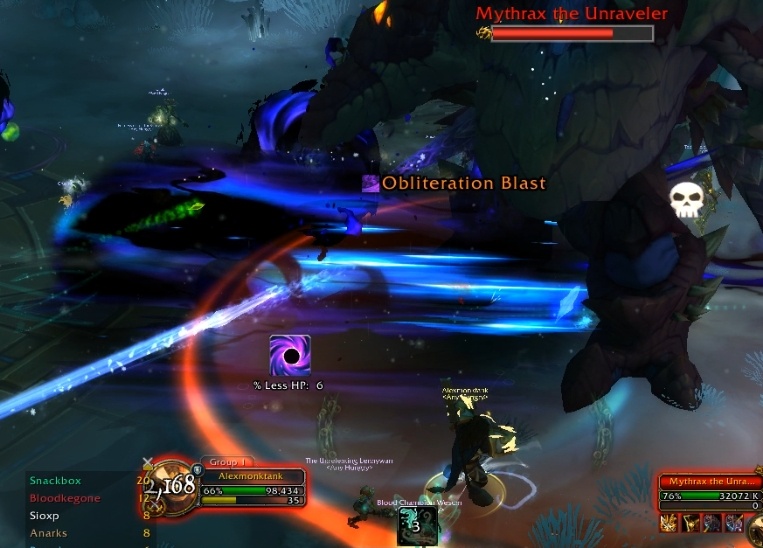
Obliteration Blast
Mythrax will face the direction of a randomly selected player and charge up his ![]() Obliteration Blast.
Obliteration Blast.
-
After three seconds, a large straight beam will fly across the encounter space, dealing a burst of shadow damage and applying Annihilation to anyone caught in its path.
-
The raid needs to quickly identify which direction Mythrax is facing and then side step the ability. Mythrax will not rotate to follow the movement of the player who he initially targeted the ability at.
-
If the raid desperately needs Existence Fragments, for the tank as an example, then this ability is one of the better ways to generate a large amount of them by having multiple raid members stand within it.
Imminent Ruin
Mythrax will apply ![]() Imminent Ruin debuffs to two randomly selected non-tank players which each deal minor shadow damage every 2 seconds over 12 seconds.
Imminent Ruin debuffs to two randomly selected non-tank players which each deal minor shadow damage every 2 seconds over 12 seconds.
-
Upon expiration, the Imminent Ruins will explode, applying Annihilation to all players within 12 yards and dealing a burst of shadow damage to the entire raid. This damage drops of with distance which caps out at 45 yards,
-
The players afflicted with Imminent Ruin should move 40+ yards away from the rest of the raid to reduce the incoming raid damage and to ensure that they are the only players who gain the stacks of Annihilation.
-
Before returning to the group, the afflicted players should gather any Existence Fragments that they have spawned as to reduce the amount of Annihilation stacks they have just gained.
-
Healers may need to follow these targets as they move away from the group as to make sure they remain healthy enough to survive the damage of the two incoming explosions.
Mythrax will continue to use all of the abilities listed above until he reaches 75% health, at which point he will move to the middle of the encounter space and enter phase two.
Phase Two
Upon entering phase two, several things will happen in quick succession.
Mythrax will cast ![]() Xalzaix's Awakening. After the 8 second cast has completed, the boss will deal a large burst of shadow damage and apply 10 stacks of
Xalzaix's Awakening. After the 8 second cast has completed, the boss will deal a large burst of shadow damage and apply 10 stacks of ![]() Annihilation to all players.
Annihilation to all players.
-
Although it would be ideal that players stack for this ability, it is key that the entire raid is spread out as two Oblivion Spheres will spawn shortly after the cast.
-
Players should not hang around to gather the Existence Fragments they have just spawned, instead the Existence Fragments should be gathered at the end of the phase.
Players should mark a stack location on the ground as the ![]() Xalzaix's Awakening is being cast.
Xalzaix's Awakening is being cast.
-
This spot should be free of all players until after both Oblivion Spheres have spawned, as otherwise the spheres may spawn on the stack point.
-
The area around this stack point should also be free of any Oblivion Spheres, as the group will likely need to move frequently throughout the phase.
-
A good location for this stack point is on the direct opposite side of the room that the group was fighting Mythrax in during phase one.
-
As soon as the spheres have spawned, the raid should rush to stack at this location to cause the Vision of Madness adds to spawn in a stacked up manner.
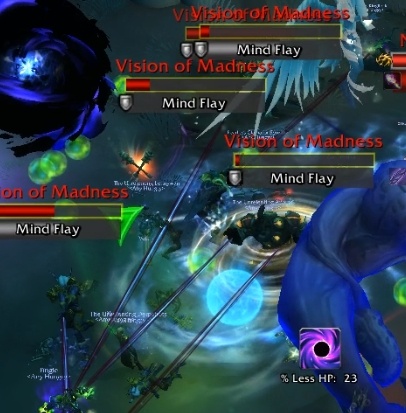
Vision of Madness adds will spawn near the locations of up to five players.
-
These immobile adds will spam cast
 Mind Flay on random players, dealing minor ticking shadow damage and slowing movement speed by 50% over 3 seconds.
 -
These adds cannot be moved in anyway, including the use of displacement abilities.
-
The group needs to kill these adds off as soon as possible, as the slowing effect of Mind Flay can make dodging mechanics difficult.
After Mythrax finishes his ![]() Xalzaix's Awakening cast, he will gain a shadowy shield around himself called
Xalzaix's Awakening cast, he will gain a shadowy shield around himself called ![]() Oblivion Veil, which reduces all incoming damage by 99% whilst dealing damage to anyone who stands within it every 3 seconds.
Oblivion Veil, which reduces all incoming damage by 99% whilst dealing damage to anyone who stands within it every 3 seconds.
-
Players should make sure that they are not stood in the middle of the encounter space, as they will otherwise take this easily avoidable damage.
Two N'raqi Destroyer adds will spawn, one in the east and another in the west.
-
Each add needs to be picked up by a tank and kept 40 yards apart from one another as otherwise they will be buffed with
 Critical Mass, increasing their damage dealt and reducing damage taken by 80%.
 -
One add should be brought to the stacked raid group as to allow melee DPS to deal damage to it whilst remaining with the rest of the raid.
-
The other should be kept away, but within range of ranged DPS who should multi-dot or long-range cleave it if possible.
-
Once the add with the group has been killed, the other add should be brought in as to allow melee DPS to begin dealing damage to it.
Both adds have access to the ![]() Essence Shear ability that Mythrax uses during phase one.
Essence Shear ability that Mythrax uses during phase one.
-
Tanks will not be able to drop the Existence Fragment inhibiting debuff before the next Essence Shear is cast, causing the tanks to gain high Annihilation stacks during this phase.
-
At the end of the phase, the tanks should absorb some of the Existence Fragments that spawned from the rest of the raid when Xalzaix's Awakening was cast.
-
The DPS should focus their damage into these N'raqi Destroyer adds to minimise the amount of Essence Shear casts that occur.
The N'raqi Destroyer adds will also cast ![]() Void Volley, an interruptible spell which deals a moderate burst of shadow damage to the entire raid.
Void Volley, an interruptible spell which deals a moderate burst of shadow damage to the entire raid.
-
This needs to be interrupted as a high priority, as the extra incoming damage will strain the healers.
-
Ranged players should interrupt the destroyer that is out of the group, whilst melee rotate their interrupts on the add close to the group.
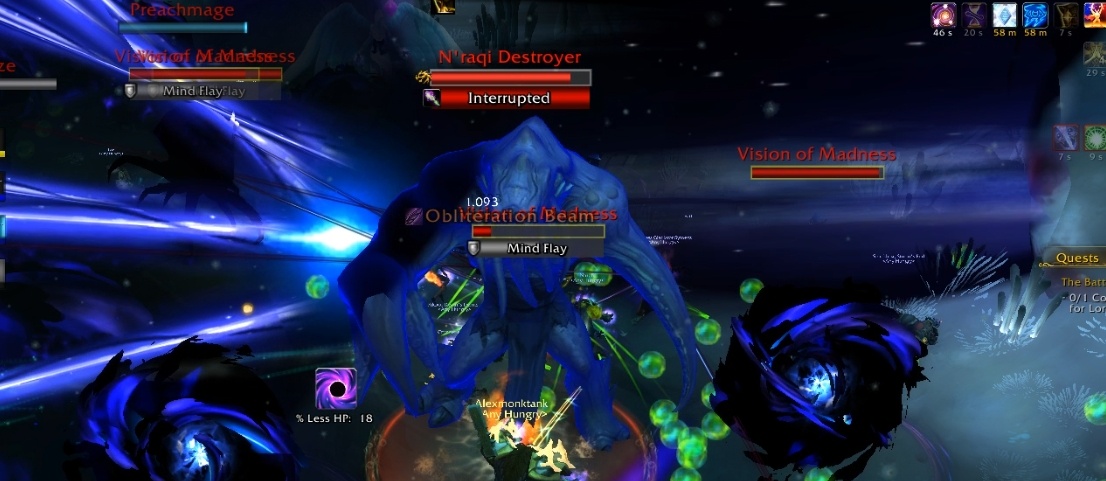
Aside from spawning more Vision of Madness adds in waves throughout the phase, Mythrax will also frequently cast ![]() Obliteration Beam.
Obliteration Beam.
-
Mythrax will face a direction and begin to charge up a beam. This can be easily identified by looking at the bosses giant purple orb of energy that it is generating.
-
The boss will unleash a beam in that direction after a few moments, dealing high shadow damage and applying Annihilation to players within it every 0.3 seconds.
-
The group must move from the incoming beam, as even spending a couple seconds within it will cause significant harm.
-
If it is directed at the stacked raid group, the raid should move as a unit in a single direction, as to ensure that everyone remains close to one another.
After roughly 1 minute, the boss will lose the ![]() Oblivion Veil and reenter phase one.
Oblivion Veil and reenter phase one.
-
The raid needs to kill off any remaining adds before entering their previous phase one formation in a relatively sphere-free area of the encounter space.
-
The fight will then continue as normal until 50%, at which point the boss will transition into phase two once again. This happens one last time at 25%.
In the last phase one, at 10% health the boss will apply ![]() Essence Shatter to the entire raid.
Essence Shatter to the entire raid.
-
This debuff prevents all players from generating Existence Fragments when gaining stacks of Annihilation.
-
This raises the tension, as the group must now defeat the boss before becoming overwhelmed by large stacks of Annihilation.
-
Groups struggling to defeat the boss during this window may want to save Bloodlust and large damage cooldowns to ensure the boss dies as soon as possible.
Raid Finder Difficulty
Aside from numerical changes, in which the boss deals less damage and has less health, there are a few mechanical changes to the Mythrax encounter on Raid Finder difficulty.
The ![]() Imminent Ruin debuffs damage no longer falls off with distance, meaning the player only needs to 12 yards away from allies to minimise the negative elements of this ability.
Imminent Ruin debuffs damage no longer falls off with distance, meaning the player only needs to 12 yards away from allies to minimise the negative elements of this ability.
-
To compensate for the removal of fall-off damage, the overall damage of this ability has been significantly reduced.
The N'raqi Destroyer adds in phase two will no longer cast ![]() Essence Shear.
Essence Shear.
-
This allows tanks to maintain a low amount of Annihilation stacks throughout the fight, as there will be no point in which they receive unavoidable Annihilation stacks whilst afflicted with the Essence Shear debuff.
Heroic Difficulty
Aside from numerical changes, in which the boss deals more damage and has more health, there are no mechanical changes to the Mythrax encounter on Heroic difficulty.
Tanks in this difficulty may wish to spend more time actively seeking ![]() Existence Fragments whilst not tanking the boss.
Existence Fragments whilst not tanking the boss.
-
This is particularly important when transitioning into phase two, as you will not be actively gathering Existence Fragments during the phase as you need to maintain strict add positioning.
Mythic Difficulty
Aside from numerical changes, in which the boss deals more damage and has more health, there are a few mechanical changes to the Mythrax encounter on Mythic difficulty.
During phase one, Mythrax gains access to the ![]() Living Weapon ability.
Living Weapon ability.
After a cast, Mythrax will throw Xalzaix to the location of a random non-tank player. Upon arriving this deals a burst of damage to all players within 8 yards.
-
The raid should ensure that they continue to spread 8 yards throughout this phase, especially when
 Living Weapon is due to be cast.
Xalzaix will remain in this location until it is damaged down to 50% health, at which point it will retreat and regain it's health back.
-
Whilst in this location, it will spam cast
 Void Echoes. This uninterruptible cast deals a burst of damage to the entire raid whilst also buffing the damage of subsequent Void Echoes by 50%. This effect stacks.
 -
The group needs to nuke down Xalzaix before it has the chance to cast too many Void Echoes, as this damage will quickly overwhelm the raid.
Xalzaix will also cast ![]() Obliteration Blast. This acts identically to Mythrax's
Obliteration Blast. This acts identically to Mythrax's ![]() Obliteration Blast.
Obliteration Blast.
-
The group needs to quickly move out of the way of this blast to ensure they do not take the damage and receive the Annihilation stacks.
During phase two, Mythrax will channel his ![]() Obliteration Beam towards Xalzaix who is positioned elsewhere in the encounter space.
Obliteration Beam towards Xalzaix who is positioned elsewhere in the encounter space.
-
Xalzaix will then redirect this beam in a smaller form in a different direction.
-
Players will need to track both the direction that both Mythrax and Xalzaix face throughout this phase to make sure they are not hit by either of the beams.
Both ![]() Obliteration Beam and
Obliteration Beam and ![]() Obliteration Blast will remove any
Obliteration Blast will remove any ![]() Existence Fragments they come into contact with.
Existence Fragments they come into contact with.
-
Players will need to create a strategy which minimizes the amount of Existence Fragments that are consumed by the boss, rather than players.