GUIDA IN ITALIANO QUA
Loot
Armor:
-
Mail:
 Deathhunter's Legguards
 -
Plate:
 Roka's Bonecrushing Manacles
Azerite:
-
Cloth:
 Vestments of the Afterlife
 -
Leather:
 Phantom Stalker Shoulders
Weapons:
-
1H AGI Dagger:
 Last Fang of Rezan
 -
2H INT Staff:
 Deathspeaker Spire
Trinkets:
-
Tank:
 Bwonsamdi's Bargain
 -
Healer:
 Mirror of Entwined Fate
Quick Tips
-
Focus down the bodyguard adds during phase one whilst cleaving damage onto Rastakhan.
-
Stack up to help split the damage of the
 Meteor Leap.
 -
Run away when targeted by the
 Seal of Purification.
 -
Dodge the toads spawned via
 Plague of Toads.
 -
Do not stand within Bwonsamdi's
 Aura of Death.
 -
Ranged players need to be spread 7+ yards to prevent the
 Plague of Fire from spreading.
 -
Quickly kill the
 Zombie Dust Totem.
 -
Place
 Death Rifts around the edges of the encounter space.
 -
Half the healers and the majority of DPS need to run towards Bwonsamdi when he casts
 Bwonsamdi's Boon at the end of phase two.
 -
Dodge
 Dread Reaping zones that travel throughout both realms.
 -
Players in the Death Realm need to stagger the rate they enter Death Rifts to clear the Deathly Withering stacks.
-
Run against the pull in when Inevitable Demise is cast.
-
Soak each of the
 Seal of Bwonsamdi zones.
Tank Specific Tips
-
Move away from Rastakhan when targeted by
 Scorching Detonation.
 -
During phase one: stack up Rastakhan and his adds.
-
Taunt off one another after each
 Crushing Leap.
 -
During phase two: keep Bwonsamdi 30+ yards away from the rest of the raid.
-
Be healthy before each
 Caress of Death.
 -
Taunt and switch jobs after each Scorching Detonation during phase two.
-
Run away from Bwonsamdi as he casts Bwonsamdi's Boon at the start of phase three.
-
Take turns taking the Necrotic Smash away from the group.
Healer Specific Tips
-
Make sure the raid is healthy before each Meteor Leap.
-
Assign one healer to keep the Bwonsamdi tank healthy during phase two.
-
Players afflicted by Caress of Death are healing immune. Quickly heal back to full after the debuff expires.
-
Prepare to use healing cooldowns during phase three to counteract the
 Withering Bursts triggered by players dropping Deathly Withering stacks.
 -
King Rastakhan gets stronger and stronger throughout phase three and four! Be ready to stagger healing cooldowns to counteract this.
King Rastakhan Abilities & Strategy
Phase One
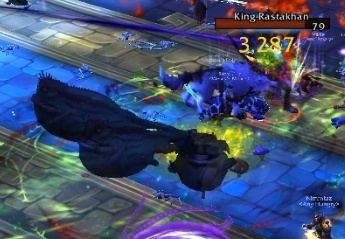
The fight starts with the raid engaging King Rastakhan and his two bodyguards (this is increased to three on heroic). The phase will end once all bodyguards have been defeated.
King Rastakhan
 Bind Soulss
Rastakhan begins the encounter by casting ![]() Bind Soulss. This causes all damage taken by Rastakhan to instead be transferred evenly amongst his bodyguards.
Bind Soulss. This causes all damage taken by Rastakhan to instead be transferred evenly amongst his bodyguards.
-
Players should not focus down Rastakhan specifically during this phase, instead opting to passively cleave damage onto him throughout the phase to gain additional damage onto the bodyguards.
Scorching Detonation
Rastakhan will frequently channel ![]() Scorching Detonation into the tank. This deals moderate fire damage every second over its 5 second duration.
Scorching Detonation into the tank. This deals moderate fire damage every second over its 5 second duration.
-
The tank will explode at the end of the channel, dealing a high burst of fire damage to the entire raid.
-
The further the tank is from Rastakhan, the less damage the explosion will deal to the raid.
-
The tank targeted by this ability should immediately run directly away from the boss, as to reduce the incoming raid damage as much as possible.
-
The other tank may wish to taunt Rastakhan after the channel has completed, as to prevent him from chasing after the tank in the distance.
Plague of Toads
Don't stand in the toads path!
Rastakhan will face towards a random player and sends out three toads that will hop away from him in three straight lines forming a cone shape.
-
Any players hit by a toad will cause it to explode, dealing damage and leaving a 12 sec hard hitting nature damage dot to anyone within 5 yards.
-
Players need to quickly identify the direction the toads will be travelling and side step the ability.
-
A player with an immunity can soak the toads as they spawn next to the boss, immediately countering the ability without taking any damage themselves.
-
This can be useful if the toads are due to travel into a densely populated area, such as when the raid is stacking up for the Meteor Leap ability.
The Bodyguards
Siegebreaker Roka
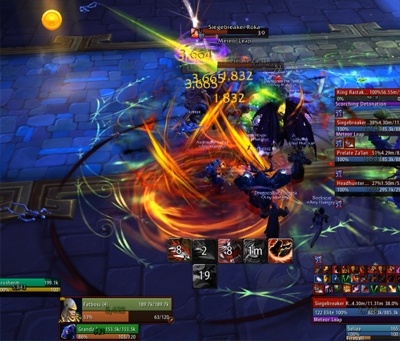
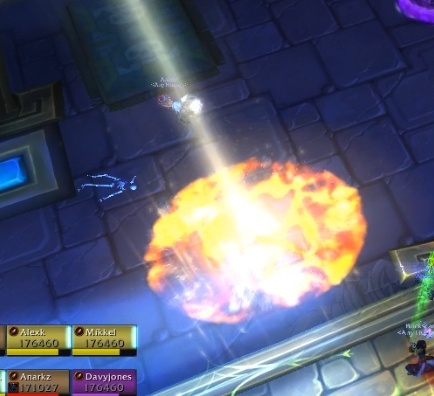
Siegebreaker Roka is the most dangerous of the two bodyguards due to her ![]() Meteor Leap ability.
Meteor Leap ability.
-
This marks a player for 5 seconds before leaping on them, dealing lethal nature damage split between all players within 8 yards.
-
All players should stack up next to the boss and adds to help split the damage of this ability, whilst allowing melee DPS and tanks to maintain their position.
-
The raid should be careful not to stack up in the path of the Plague of Toads, as the entire raid is likely to be hit by the ability.
Immediately after the ![]() Meteor Leap has been cast, Roka will cast
Meteor Leap has been cast, Roka will cast ![]() Crushing Leap on the tank.
Crushing Leap on the tank.
-
This deals a burst of physical damage to the tank and applies the
 Crushed debuff, increasing the damage taken from Crushing Leap by 500% for 40 seconds.
 -
Tanks need to alternate who tanks Siegebreaker Roka to ensure that no tank has the Crushed debuff when Crushing Leap is cast.
-
It is also possible for a non-tank player to take this ability, simply by taunting Roka before the Meteor Leap cast has finished and using some form of defensive cooldown to survive the damage.
Prelate Za'lan
Prelate Za'lan will frequently cast ![]() Seal of Purification, causing a beam to form near a player.
Seal of Purification, causing a beam to form near a player.
-
This beam will then chase the player for 6 seconds, dealing moderate Radiant damage every second to anyone hit by it.
-
The player fixated by this beam needs to kite it away from any nearby players to avoid excess raid damage.
As Siegebreaker Roka is the most dangerous of the two bodyguards, we recommend that the raid focuses its damage onto him whilst cleaving damage onto Prelate Za'lan and King Rastakhan.
Once all bodyguards have been defeated, phase two will begin.
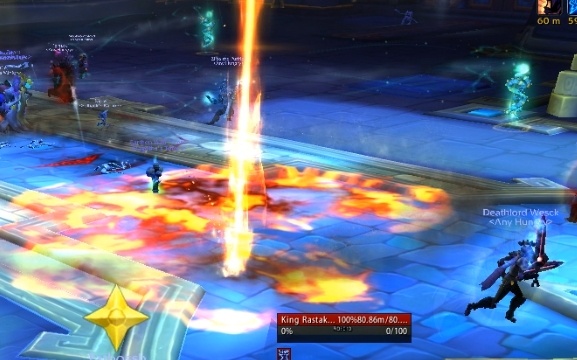
Phase Two
At the beginning of phase two, the entire raid will become stunned for 12 seconds. This stun is unavoidable and cannot be removed.
-
During this time, Bwonsamdi will appear by King Rastakhans throne and some RP will take place.
-
Bwonsamdi will then become an active enemy, just as the stun times out. Phase two has now begun.
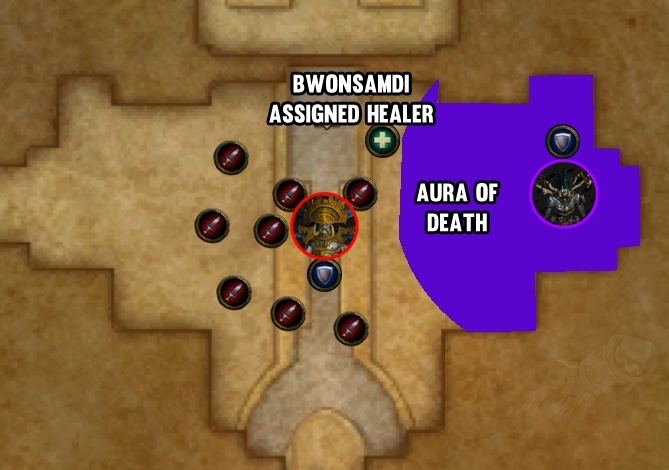
Example of phase two positioning.
King Rastakhan
King Rastakhan has maintained access to his ![]() Scorching Detonation and
Scorching Detonation and ![]() Plague of Toads abilities and has gained access to two new abilities.
Plague of Toads abilities and has gained access to two new abilities.
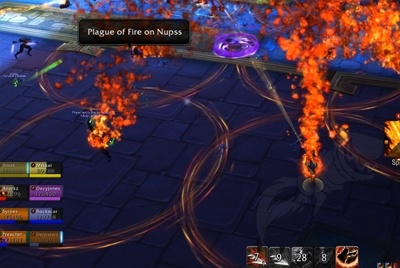
Plague of Fire
King Rastakhan will apply the ![]() Plague of Fire debuff to three random non-tank players. This prefers to target ranged players over melee.
Plague of Fire debuff to three random non-tank players. This prefers to target ranged players over melee.
-
This debuff deals a moderate burst of fire damage upon application. After expiring, it will attempt to jump to all players within 7 yards.
-
This process will repeat endlessly if there are targets for the debuff to jump to.
All ranged members should spread 7+ yards apart around the boss, as to reduce the chance that the ![]() Plague of Fire debuff will spread.
Plague of Fire debuff will spread.
-
Any melee players who receive the debuff will need to quickly spread and remain spread until the Plague of Fire has been removed entirely.
-
As long as players are quick to spread and the debuff doesn't get the chance to bounce, the Plague of Fire mechanic isn't dangerous.
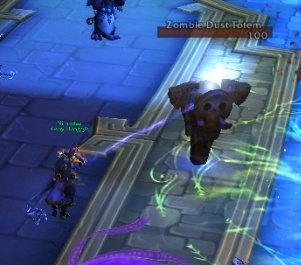
Zombie Dust Totem
King Rastakhan will spawn a ![]() Zombie Dust Totem nearby. This totem will mind control up to two players until it is destroyed.
Zombie Dust Totem nearby. This totem will mind control up to two players until it is destroyed.
-
The mind controlled players are not hostile towards allies, and others cannot attack the mind controlled players.
-
The mind controlled players will move towards the Zombie Dust Totem and attack it, randomly using spells that the player has access to. This, unfortunately, can include cooldowns.
-
All DPS should immediately swap to the Zombie Dust Totem and destroy it to free their allies.
-
Players under the effect of the totem can be hit by other mechanics, including Plague of Toads.
-
If a Plague of Toads is due to hit a mind controlled player, a player with an immunity should step in the path of the toads and take them instead.
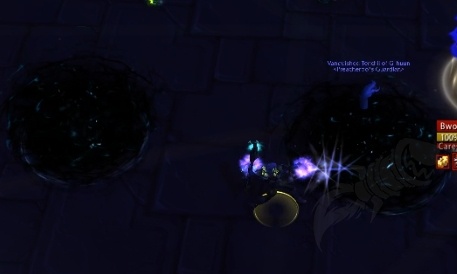
Bwonsamdi
Bwonsamdi needs to be tanked and cannot receive any form of damage due to his ![]() Unliving passive.
Unliving passive.
-
Threat is still generated on Bwonsamdi in the usual manner, even though damage isn't actually done.
-
All DPS should focus their damage into King Rastakhan throughout the phase, largely ignoring Bwonsamdi as a damage target.
Aura of Death
Bwonsamdi has an aura which applies a stack of Deathly Withering every 3 seconds to all players within 30 yards.
-
Deathly Withering deals a low amount of shadow damage every 3 seconds, but can become dangerous when on high stacks.
-
Deathly Withering will eventually expire on a player once they move away the Aura of Death radius.
-
The tank should immediately position Bwonsamdi in the far eastern or western side of the room whilst the rest of the raid fights King Rastakhan in the middle.
-
This will prevent any players, aside from the tank, from gaining any Deathly Withering stacks.
-
A single healer should be assigned to keep this tank healthy, whilst remaining 30+ yards away from Bwonsamdi as to avoid taking Deathly Withering stacks themselves.
Eventually, the tank will need to drop their own Deathly Withering stacks. This should be done by having the King Rastakhan tank move and taunt Bwonsamdi during a ![]() Scorching Detonation.
Scorching Detonation.
-
The Deathly Withering afflicted tank can then move over and taunt King Rastakhan, keeping him in his position over 40 yards away.
-
This will allow both the Scorching Detonation to deal low damage, whilst allowing the Deathly Withering stacked tank to reset their stacks.
-
This manoeuvre should be executed every time Scorching Detonation is cast.
Caress of Death
Bwonsamdi will cast ![]() Caress of Death on the tank, dealing a moderate burst of shadow damage and leaving a 5 second debuff which absorbs all incoming healing.
Caress of Death on the tank, dealing a moderate burst of shadow damage and leaving a 5 second debuff which absorbs all incoming healing.
-
The tank must ensure they are at full health before the spell cast finishes, as they need to survive the next 5 seconds without any healing.
-
If this is done, the tank must not drag Bwonsamdi towards the raid as the Aura of Death will hit players unnecessarily.
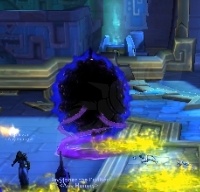
 Death's Door
Bwonsamdi will occasionally apply a ![]() Death's Door debuff to a random non-tank player.
Death's Door debuff to a random non-tank player.
-
This debuff deals ticking damage over it's 8 second duration. Upon expiration, a Death Rift forms at the players location.
-
This Death Rift is used to counter mechanics seen during phase three of this encounter, namely allowing players within the Death Realm to reset their Deathly Withering stacks.
-
Players with this debuff should allow it to expire at the edge of the encounter space, as to allow players within the Living Realm during phase three and four to easily dodge Dread Reaping projectiles.
-
At least one Death Rift should be placed near Bwonsamdi during phase two, as ranged players are likely to be in that area during phase three.
Once King Rastakhan has reached 60% health, Bwonsamdi will begin to cast ![]() Bwonsamdi's Boon, applying a 2% permanent damage increase buff to King Rastakhan which gains 1 stack every 15 seconds.
Bwonsamdi's Boon, applying a 2% permanent damage increase buff to King Rastakhan which gains 1 stack every 15 seconds.
-
At the end of the cast, Bwonsamdi will drag the nearest half of the raid to him and phase three will begin.
Phase Three
Death Realm
The half of the raid that was dragged to Bwonsamdi will enter the Death Realm.
-
Whilst within the Death Realm, players cannot interact with other players or enemies left in the standard "living realm".
-
The raid can choose who enters this realm by simply positioning those players nearest to Bwonsamdi.
-
This selection of players should consist of half of the healers and DPS. No tanks should enter the Death Realm.
-
The Bwonsamdi tank at the end of phase two needs to move as far from Bwonsamdi as possible as soon as the Bwonsamdi's Boon cast has begun.
Players within the Death Realm will face against Bwonsamdi, who is now susceptible to damage.
-
The phase will end once Bwonsamdi reaches 50% health.
Bwonsamdi maintains his ![]() Aura of Death, however this now applies to all players within the Death Realm, rather than those within 30 yards of him.
Aura of Death, however this now applies to all players within the Death Realm, rather than those within 30 yards of him.
-
The Death Rifts spawned during phase two can be ran into whilst within the Death Realm.
-
Doing so will remove all stacks of Deathly Withering whilst dealing a small burst of damage to all players within both realms via Withering Burst.
-
The Death Realm players must stagger the rate in which the enter the Death Rifts, as going too often will cause the Withering Burst damage to overwhelm healers, and not going often enough will cause Deathly Withering stacks to get too high.
-
We recommend that a single player in the Death Realm calls out a player to reset their stacks every 2-3 seconds. This should keep all Deathly Withering stacks below 20, whilst not overwhelming healers with Withering Burst.
Bwonsamdi does not need to be tanked in the Death Realm. He will remain stationary in the middle of the encounter space and spam cast ![]() Caress of Death on random players.
Caress of Death on random players.
-
During this phase, Caress of Death deals less initial damage and makes the player healing immune for 3 seconds instead of 5.
-
Healers within this phase need to ensure the all players are kept healthy and do not die during the Caress of Death healing immunity windows.
 Inevitable End
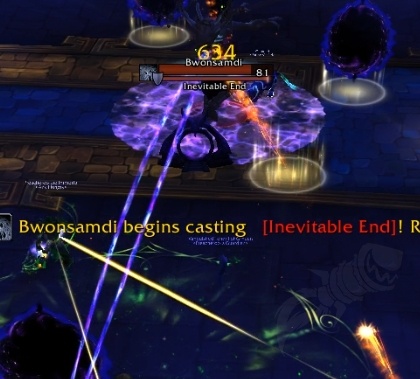
Bwosamdi will also cast ![]() Inevitable End. This creates a 5 yard zone around him that will instantly kill any player who enters it.
Inevitable End. This creates a 5 yard zone around him that will instantly kill any player who enters it.
-
During this time, he will also drag in all players towards his location.
-
Everyone needs to run against the pull in to avoid standing within the zone.
-
Melee DPS should always attack Bwonsamdi from maximum melee range to make sure they aren't immediately caught in the zone when the cast begins.
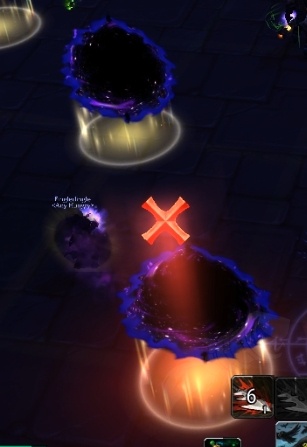
Dread Reaping
![]() Dread Reaping patches will radiate in a spiral pattern from two corners of the encounter space.
Dread Reaping patches will radiate in a spiral pattern from two corners of the encounter space.
-
Standing within a Dread Reaping patch will deal high shadow damage every second.
-
Players need to actively dodge the patches throughout the phase to keep incoming raid damage to a minimum.
Any ![]() Dread Reaping patch that comes into contact with a
Dread Reaping patch that comes into contact with a ![]() Death Rift will phase into the Living Realm.
Death Rift will phase into the Living Realm.
-
Players within the Living Realm need to be prepared to dodge these patches as well.
-
This is most easily done by standing away from any Death Rifts, which should be placed around the edges of the encounter space.
Living Realm
Players left behind in the Living Realm will need to continue to deal with King Rastakhan.
-
The boss maintains his Scorching Detonation and Zombie Dust Totem casts, but has lost access to his Plague of Fire and Plague of Toad abilites.
-
The Scorching Detonation and Zombie Dust Totem should continue to be dealt with in the same way as phase two.
Two adds will spawn at the beginning of the phase. Both adds need to be tanked.
-
The two adds have the
 Undying Relentlessness passive, which makes them immune to crowd control 60 seconds after activating.
 -
This mechanic was added after the most recent testing, so it is unclear what crowd control works during this 60 second period.
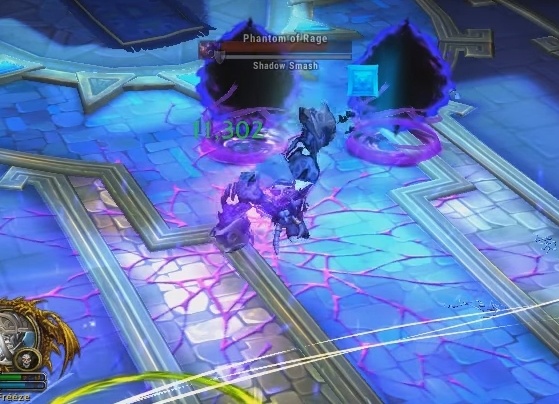
Phantom of Rage
This add will cast Necrotic Smash on the tank, dealing a high burst of shadow damage and applying an 8 sec debuff which reduces incoming healing by 50% to all players within a ~10 yard smash zone.
-
The Phantom of Rage tank needs to move 10 yards away from any other player to allow the Necrotic Smash to hit only them.
-
After the hit, the other tank should taunt to keep the debuffed tanks incoming damage low.
-
It was possible to avoid the hit all together during PTR testing, by having a Monk tank Chi Torpedo just as the cast ended.
-
If this is still possible, we recommend a highly mobile tank, such as a Monk or Warrior, tanks this add full time and avoids all of the Necrotic Smash casts.
Phantom of Retribution
This add will spam cast ![]() Grave Bolt, dealing a moderate burst of shadow damage to the tank.
Grave Bolt, dealing a moderate burst of shadow damage to the tank.
-
This cast is interruptible and doing so will help the tanks position the add better whilst reducing incoming damage.
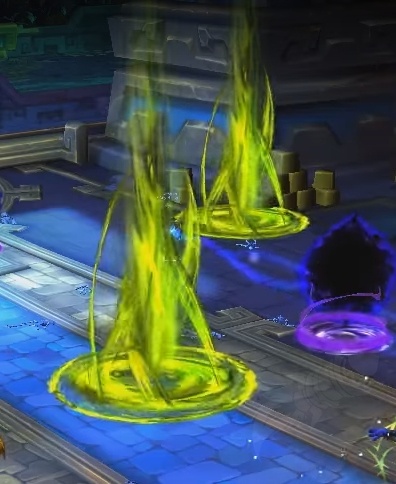
The main ability cast by the Phantom of Retribution is ![]() Seal of Bwonsamdi.
Seal of Bwonsamdi.
-
This marks several zones and throws a bolt towards each of them. If the zone has no player within it by the time the bolt lands, a
 Bwonsamdi's Wrath will trigger, dealing high shadow damage to the raid.
 -
Each zone needs to have a single player stand within it to prevent any Bwonsamdi's Wrath triggers. The player stood within a zone will take a high burst of shadow damage, but the raid will not.
-
Players soaking these zones need to healthy before the bolts land as to ensure they survive the high incoming damage.
DPS within the Living Realm should focus on killing both phantom adds. The adds should be stacked as often as possible to allow good cleave damage between them and King Rastakhan.
-
In the event that the phantom adds can be hard crowd controlled for 60 seconds, the Living Realm should do so, as the Death Realm players will rejoin them before this time period has ended.
Once Bwonsamdi has reached 50% health in the Death Realm, all players will return to the living realm and phase four will begin.
-
All phantom adds should be killed as soon as possible to allow the raid to focus on King Rastakhans mechanics in isolation.
Phase Four
King Rastakhan maintains his ![]() Bwonsamdi's Boon buff and it will continue to stack.
Bwonsamdi's Boon buff and it will continue to stack.
-
He will have access to the Scorching Detonation, Plague of Toads and Plague of Fire abilities, and lost access to the Zombie Dust Totem ability.
These abilities should be dealt with in the same manner as phase two.
-
Death's Door Death Rifts should continue to be placed away from the centre of the encounter space to minimize the amount of Dread Reaping zones that enter the middle of the room.
-
Ranged players must remain spread to ensure that the Plague of Fire does not spread.
-
Players will need to dodge the Plague of Toads and need to run against the Inevitable End pull in whilst dodging any Dread Reaping zones that enter via the Death Rift's.
King Rastakhan will also cast ![]() All Encompassing Death, creating a
All Encompassing Death, creating a ![]() Death Rift around him.
Death Rift around him.
-
This mechanic was not present during any PTR tests, so it's true nature is currently unknown.
-
This ability will like occur towards the end of the encounter and will cause Rastakhan to be a "mobile Death Rift", allowing Dread Reaping zones to spawn in from his location.
The raid must defeat King Rastakhan before his ![]() Bwonsamdi's Boon buff overwhelms the raid.
Bwonsamdi's Boon buff overwhelms the raid.
-
Bloodlust should be used when it best aligns with DPS cooldowns, and healing cooldowns should be staggered throughout the later stages of the encounter to cover the increased damage from the Scorching Detonation.
Heroic Difficulty
Headhunter Gal'wana
Players will face an additional bodyguard at the beginning of the encounter: Headhunter Gal'wana.
-
This add will frequently cast Grevious Axe at a random player, dealing a burst of physical damage and applying a permanent physical damage dot.
-
The dot left by the ability can only be removed by healing the player above 90% health. Healers should aim to do this as soon as possible.
-
Headhunter Gal'wana is a low priority bodyguard and should not be deliberately focused down over the others.
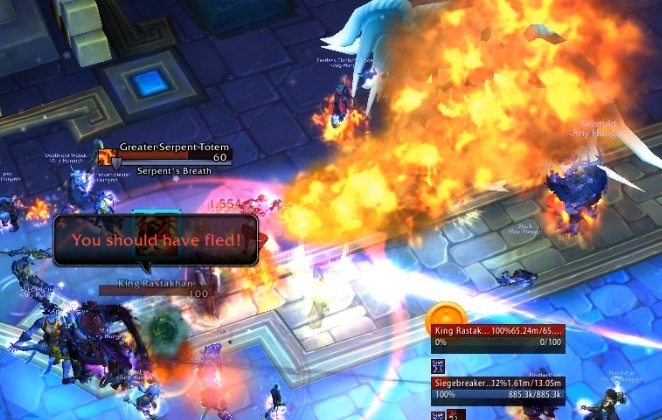
 Greater Serpent Totem
King Rastakhan gains one additional mechanic during phase one: ![]() Greater Serpent Totem which spawns a
Greater Serpent Totem which spawns a ![]() Greater Serpent Totem add nearby.
Greater Serpent Totem add nearby.
-
This totem will frequently face a random nearby player and channel a
 Serpent's Breath, dealing a large initial burst of fire damage and applying a 5 second fire damage dot afterwards.
 -
Players need to quickly focus damage into this totem to kill it, whilst making sure they dodge its frontal Serpent's Breath.
An alternative strategy can be used to help counter the disruptive effects of the ![]() Greater Serpent Totem.
Greater Serpent Totem.
-
At the beginning of the encounter, King Rastakhan can be positioned at the far edge of the room[li]30+ yards away from the raid.
-
As the Greater Serpent Totem spawns next to Rastakhan and only targets nearby players, the entire raid can ignore them and focus down the adds whilst a single tank dodges the ability.
-
This tank will need to have a healer assigned to stand 30+ yards away from them and keep them healthy throughout this time.
-
This strategy also allows more time for players to dodge the Plague of Toads, as they have far longer to travel before hitting the raid.
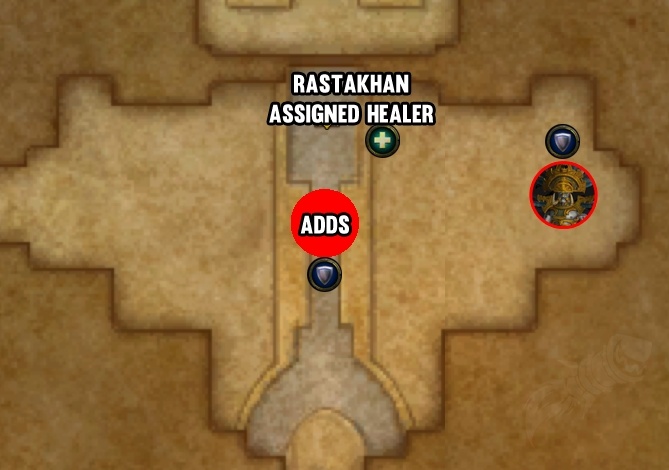
Example of "adds only" strategy for phase one on heroic.
The downsides of this strategy is that the adds will likely take slightly longer to die, as they will not be receiving the transferred cleave damage via ![]() Bind Soulss.
Bind Soulss.
-
Additionally, the add tank will not have a partner to spread the Crushed debuff with.
-
This can be fixed by using a large amount of damage reduction cooldowns on the second hit, or by having another non-tank player taunt for the Crushing Leap cast.
Which of the two strategies is superior is currently unknown. This section of the guide will be updated once guilds start defeating King Rastakhan on heroic on live servers.
Plague of Toads Changes
The ![]() Plague of Toads will leave behind a
Plague of Toads will leave behind a ![]() Poison Toad Slime pool each time they bounce.
Poison Toad Slime pool each time they bounce.
-
This pool deals moderate nature ticking damage and slows movement speeds by 30% to anyone who stands within them.
-
These pools are more of an irritant than a major issue. Raids simply need to make sure they avoid standing within them until they despawn.
Plague of Fire Changes
The ![]() Plague of Fire will now attempt to spread after 1.5 seconds, rather than 2.
Plague of Fire will now attempt to spread after 1.5 seconds, rather than 2.
-
This gives players less time to react to the ability before it jumps around.
-
Ranged players need to make sure they are spread out 7+ yards before the ability comes in.
Phantom of Slaughter
One additional add will spawn in the Living Realm at the beginning of phase three: the Phantom of Slaughter.
-
Alongside
 Grave Bolt, this add will cast
  Focused Demise on a random player.
 -
Focused Demised deals moderate shadow damage every second for 5 seconds and can only be interrupted by the player it is cast on.
-
Players targeted by this should interrupt it if possible. Players without an interrupt need to be spot healed to survive the spell.
This add, alongside the others, should be stacked up and cleaved down by the Living Realm players.
Mythic Difficulty
Seal of Purification Changes
Prelate Za'lans ![]() Seal of Purification now leaves behind a trail of fire as it chases its target.
Seal of Purification now leaves behind a trail of fire as it chases its target.
-
The player needs to ensure they do not kite the beam anywhere near the raid, as this will greatly limit the space the raid has to play in.
 Grievous Axe Flurry
Headhunter Gal'wana will cast ![]() Grievous Axe Flurry, throwing three
Grievous Axe Flurry, throwing three ![]() Grievous Axes in quick succession.
Grievous Axes in quick succession.
-
Healers simply need to heal up three debuffs instead of one.
Plague of Fire Changes
The ![]() Plague of Fire will attempt to spread after 1.3 seconds, down from 1.5 on heroic.
Plague of Fire will attempt to spread after 1.3 seconds, down from 1.5 on heroic.
Aura of Death Changes
Bwonsamdi's ![]() Aura of Death now has a range of 45 yards, up from 30.
Aura of Death now has a range of 45 yards, up from 30.
-
This will cause any healers keeping the tank healthy to also gain stacks.
-
Healers will likely need to form a rotation of who heals the Bwonsamdi tank at which point, as to keep Deathly Withering stacks to a minimum.
Phantom Add Changes
All three phantom adds in phase three have the ![]() Empowered Spirit passive, causing them to spawn a
Empowered Spirit passive, causing them to spawn a ![]() Death Rift and enter the Death Realm upon death.
Death Rift and enter the Death Realm upon death.
-
These adds will need to be defeated in a way to spawn the Death Rift in ideal locations.
-
They also should not be killed whilst players are within the Death Realm, as otherwise they will likely decimate the tank-less group.
